I have moved! Please visit my new location as I will be updating the entire site soon.
Oh Hai!
Hello and a very happy new year to you all!
It’s been a while since I’ve posted regularly but as you may know, I’m kinda’ super pregnant. Yeah. Like over 7 months pregnant now, and yes, that is an excuse, but a darned good one I think. I am also a bit distracted with the possibility that we are going to have to move out of the house we currently reside in. If we do, we will be doing it very soon after the baby arrives. Yuck.
BUT…
I am planning on celebrating the year long life of this here, little blog, by doing a little remodeling so if you stop by before the next post, expect some changes and a little construction, otherwise, I’ll be back again soon with a new look and some great new recipes and recipe reviews.
☆☆☆☆☆☆☆☆☆☆☆☆☆☆☆☆☆☆☆☆☆☆☆☆☆☆☆☆☆☆☆☆☆☆☆☆☆☆☆☆☆☆
A Change is Gonna’ Come
A friend of mine just did a blog post about saying goodbye to 2010 and all the amazing things that she went through and I thought, “Um…I kinda’ did a lot of stuff. Maybe I should mention it too”
In fact, I have absolutely no reservations when I say, the year of 2010 was the greatest year of my life. So far. Period. And I think I am a little sad to say goodbye to it. I don’t think I’ve ever been sad to say goodbye to a stupid year before. Let me show you why.
I started writing down some of the silly things I know = this blog

I went to Manhattan for the first time to shop for a wedding dress

I turned 30 and RPK and I both quit smoking

after a year and a half planning
We totally, finally got married

RPK accepted a position at UW and
we took a trip to Madison to check out our new hometown

We went on an amazing honeymoon

to St. Lucia

RPK had a birthday and we moved to Wisconsin

We're both very excited despite what this photo implies.
6 days later we discover
WE’RE HAVING A BABY

Whew! I’m exhausted just from posting this!
Blog, wedding, honeymoon, move, baby…Um, yeah. I’m kind of a go getter.
Although I will miss it, there are obvious reasons to welcome this new year so I hope you ring it in with joy as well and decide to join me in 2011 for whatever crafting, cooking, tipping, sewing, stitching, knitting craziness I decide to get myself into.

Oh yeah! And don’t forget to eat your black eyed peas!
To you and yours…
I know I’ve been gone a whole month but I wanted to wish you all very
happy holidays
before they’re over!
No, I didn’t take some special holiday-ish photo to post here because just like you, I’m a busy lady ’round this time!
I hope you all get spoiled rotten with gifts and/or food and/or loving…whichever floats your boat. Me? I’ll take all of the above please.
When I feel up to coming back, I see bright and colorful crafts in our future as well as tips on how to cook game hen and an update on all the knitting I have not been doing. Thanks to everyone for reading and all your support for my silly little blog.
Cheers and a very happy new year to you all!
-Wendi
Household Hints Pg.8

42: Err. So I have read it’s not exactly the same even though I have done this. I definitely wouldn’t do this for a large amount but it does work as an emergency substitution.
44: Whoa. Weird, right?
46: hmm.
48&50: Told ya’ so.
53: Novel idea, ‘eh?
DIY Ornaments & Home for the Holidays pt.4
This is just another one of those, “you already know about this but maybe you forgot and thanks for the reminder” kinda projects.
Hey, I never claimed to be a genius…just helpful.
Pine cone Ornament
Get dressed. Go outside. Find this:

Actually, you should find more than one..then take them home…
(even though they are beautiful in their natural habitat.)
 then you need some of this…
(spray paint. any kind. I buy this because it’s tiny and cheap.)
Gold, silver, white, whatever…
and

 some glue, glitter and some nice ribbon or string.
DRUMROLL PUHLEEASE!


I mean, I know it’s not rocket science but it doesn’t have to be. When these have pretty little lights surrounding them they will look like you snatched ’em right out of a Pottery Barn catalog. As Ina would say, “How easy is that?”
DIY Ornaments & Home for the Holidays pt.3
One: This one is for kids depending upon supervision and age.
Two: I don’t have great photos because these are particularly difficult to photograph. You are going to have to use your imagination.
Frosted/Etched Ornaments

O.K. Yes. Get some of these…

…and some of this. This brand is called Armour Etch and it’s glass etching cream and unless you live in a sketchy neighborhood, you should be able to get it at your local craft store.
Yours will also look better than this as it won’t be 50 years old.
I actually keep this on hand because it’s awesome for personalizing gifts. I like to buy plain wine glasses and use this to personalize them for gifts and such. That way, you can put nicknames or dirty messages or whatever on them.
You’ll also want a paintbrush and maybe also some stickers and gloves are only needed if you have extra sensitive skin.

Paint (with your Armour Etch) incredibly sweet and romantic things on your ornament all by yourself so that your wife goes, “Awwww. Oh my gawd, I love you, you’re so sweet! Let’s make out.”

Or you could use your stickers or stencils or pretty handwriting and do initials and monograms and whatnot. Those little white stickers that you can buy at the office supply place for your holes in your notebook paper…Yeah. Those make great polka dots. Just look around. If you use stickers, say you have a bunch of stars, you’ll be using them to mask the glass so you will end up with a frosty ornament with clear stars. This uses more cream so decide ahead of time what you will prefer to make sure you buy the right size. Also, don’t spread the cream thinly. I recommend painting it on generously.
Then, read the directions and let it sit. It’s only a few minutes or so.

Then you will rinse off the cream and you will have some beautiful fancy ornaments! IF your etching is not as evenly frosted as you would like, you can simply go over it again. Make sure to wash your hands and brushes as well.
DIY Ornaments & Home for the Holidays pt.2
Glittery Ornaments
I am a cliché’ of a woman in one way; I like things that sparkle.
I take that back.
I LOVE things that sparkle.
I especially love sparkly things on Christmas trees surrounded by lights. Here’s to things that glitter and shine.

Get some of these again…

and some spray glue and some glitter…

and some regular glue.
No, you don’t have to give Martha your money.
This seemed just like Elmer’s to me.

And maybe some paintbrushes if you want.

Draw some designs with your glue on the outside…
(You could write names, dates, messages or even use stencils!)

Sprinkle and set aside to dry.
OR…
Spray the inside of your ornament with the spray glue…

Errr…That’s a little too much.
If you make a whoopsie, just drop a little bit of water in there.
You’ll swoosh it around and then pour out the excess.
This just thins out your glue a bit.
It will still work.
Pour in some glitter. Tape over the hole and shake. Pour out the excess glitter.
And now you have:

For the ones you set aside, allow those to dry for a day and then take them outside and brush off the excess glitter. I used a soft bristled paintbrush and it worked really well. It’s easy to drop them when you do this so I suggest sticking a finger into the hole at the top as opposed to holding it.


Stay tuned! There’s more!
DIY Ornaments & Home for the Holidays pt.1
So this year is going to be quite different for RPK and I. Not only are we having turkey day alone together but we are doing the same for Christmas as well. Last T-day, I cooked for 6 people and the one before that, I cooked for just he and I. That was our first Thanksgiving together in our own home. We have also usually traveled to North Carolina for Christmas minus last year. Our trip was canceled at the last minute due to the pilots being scared to land in Providence (where we were) because the weather was so crazy. We ended up having an impromptu Christmas in our own place. This meant buying one of the last packages of tiny ornaments they had at Michael’s and placing beads on hooks as opposed to ornaments and using a rosemary bush as our tree. (How ’bout that pile of presents, ‘eh?)
Oh yeah. We totally used socks for our stockings too. They looked completely ridiculous.

Of course, it was a beautiful thing. But as I said, this year is different. This year we will have a tree. A real one. In our house. With decorations and real ornaments. And real stockings. In a city that we will live in for a very long time. However, you can’t just go out and buy all the ornaments you want right away.
(Or maybe you can. What do I know? You very well could be a millionaire.)
These are things that must be gifted and collected over time. But you don’t want your first tree looking naked or repetitive either so here are some ideas for making some of your own ornaments. They are inexpensive and since you made them, you can choose when and if they should get scrapped and replaced with a nicer one down the road.
This was also a really nice craft date for me and RPK. I’m going to really love seeing the ornaments, year after year, we made together for our last Christmas alone, before we have this wee one.
Here are some ideas for those super neat blank and plain ornaments. You can find them at all the craft stores now a days. They come in 4 or five different sizes. They don’t come with ideas on how to make them pretty though and staring at all those DIY glass balls can get kind of intimidating. You can also totally do this with your kids. I think it’s nice to let them make “real” ornaments instead of just things made out of popsicle sticks. If you are uncomfortable with glass, they are also selling ornaments exactly like these but plastic. No one will ever know the difference.
For marbled ornaments:

Go get some of these guys.

and get some of this. It doesn't have to be this brand. Just any old cheap acrylic paint will do. It MUST be acrylic though. These were 2 for a dollar. I bought 4. I chose red and white but obviously there are many more options. Some metallics might be pretty too!

Squeeze some of your paint into the ornament. There's not really a right or wrong way. You can pool the colors on top of each other at the bottom or pour it onto the sides. Remember, it would take a LOT of agitation to actually mix your colors into pink so don't be afraid!

Concentrate very hard.

Make sure you have enough paint in there. Put a piece of tape over the top.

Shake vigorously! The more you shake, the more marbled it will get. If you shake waaaaay too much, it will just mix and turn pink.

(Oops, I forgot to mention an old egg carton is good to have around. I accidentally threw mine out.) When you've achieved the desired look, turn upside down and pour the super excess paint out. Then sit them upright on a clean surface. Since I forgot my egg carton, we used the clear plastic top to rest them in after dumping the paint.
Get creative! RPK used a toothpick to swirl his paint around and got a beautiful super marbled look:

You may have to work the paint around the ornament slowly depending upon the effect you want.

OR you can this effect by NOT shaking and just slowly swirling the paint around.
O.K. The hard part is letting them dry. They will take a week, sometimes even two or three, depending on how much paint is still in them. Leave the caps off and just let them sit upright for that time. After a week, stick a toothpick into the bottom of one to see if it’s totally dry or not. This will be the thickest part of the paint accumulation and when that’s dry, you can put the tops on.

Baking, Roasting, and Eating Pumpkin
First, you are going to go buy some pie pumpkins, then you will bake them, then you will have your own pumpkin for pies and breads and whatnot and then you will NOT buy canned pumpkin. Then you will roast the seeds and give them to someone who likes that sort of thing…maybe this someone is you. Then you will make the greatest pumpkin bread on Earth and then you will keep one loaf for yourself and then you will give one loaf to someone who likes that sort of thing…maybe that someone is you again. Then you will eat it for breakfast and be incapable of denying it’s magnificence.
Then you will be incredibly happy.
Ready? OKAY!
BAKING
FIRST: You are going to buy PIE pumpkins. Not jack-o-lantern type pumpkins.

The difference? Pie pumpkins are smaller and sweeter. And they are typically labeled “pie pumpkins” anywhere you may find them. (That little guy up there? The one with his brains spilling out of his head? That’s it.)
2 medium sized ones will get you plenty of pumpkin for this bread recipe with a little left over.
(It calls for 2 cups.)
- Preheat your oven to 325°.
- Take your pie pumpkins and knock off the stem. Do this with a good yank, the counter top or a good karate chop. (Not responsible for injuries obtained from inexperienced karate choppers.)
- Next, with a large chef’s knife, CAREFULLY cut each pumpkin in half from top to bottom. (My first 2 were pretty tough skinned and cutting them really took some effort. However, the ones I just made were incredibly easy to cut. Keep in mind that this is a possibility.)

- Scoop out the seeds and stringy guts. (What are you doing?!! Don’t throw that away!)
Put them aside. - Turn open side down on an ungreased cookie sheet.
(Some people like to use water in this step. Not only do I find it unnecessary but I find it typically creates an extra step for you later on.) - Bake anywhere from 45 minutes to an hour and a half, depending on the size of your pumpkins. They are ready when a fork easily penetrates the meat.
- Flip them and allow to cool.
- Scoop out meat and puree in a food processor.
(Some pumpkins are really watery. No biggie. Allow it to sit in the fridge overnight. The pumpkin will sink and you can easily pour out the excess water. I’ve actually never had to do this though.)Now you have pumpkin like in a can, but not in a can.
ROASTING
the seeds

- Preheat your oven to 200 or the next lowest temperature available.
- Get a medium bowl.
- Pick up one of the clumps of pumpkin string/meat/seeds and squash it in your hand. You will notice the seeds, very easily separate from the rest of the pumpkin and slip through your fingers. Keep doing this, putting the seeds in the bowl and discarding the stringy meat. It doesn’t have to be perfect.
- Fill your bowl with cool water and swoosh around. Let sit for 3 minutes.
- You will notice most of the loose meat has sunk. Skim the seeds off the top and place them onto a cookie sheet.
- Bake these seeds at 200 just until dry. (about 5-10 minutes). You’re not roasting them here. Just drying them. No, a towel won’t work.
- Increase your temperature to 300°
- Melt 2 tablespoons of butter or use 1 Tablespoon olive oil (for a semi healthier and longer lasting snack) and toss seeds in it. Add 1/2 tsp sea salt and toss.
- Roast until medium to dark golden brown.
- Receive kisses from happy husbands or sneak into the corner and keep them all for yourself.
Note: Get creative. Some people don’t want salty. They want spicy or honey roasted or ranchy or BBQ!

If you have never had roasted pumpkin seeds, I personally think they taste a lot like popcorn. Then again, I'm pregnant.
EATING
the best part
(this involves some baking too.)
Now, go here and proceed to bake your bread with your fancy non canned pumpkin.
Here are the only changes I make to the recipe:
- I use fresh pumpkin and I use 2 cups of it.
- I use 2 loaf pans that are 8 X 4 X 2 1/2″ and bake them longer.
- I add a pinch of Cardamom.
- I don’t allow anyone to touch it for 24 hours.

That is it. No. Don’t try subbing o.j. or applesauce or anything else for the water. (O.K. Subbing half the amount of water for o.j. or applesauce works, but really, it doesn’t make THAT big of a difference.) Don’t try changing up the spices or using any amount of brown sugar instead of regular or using a tad less flour and CERTAINLY, WITHOUT A DOUBT, DO NOT let anyone try it the same day it’s baked. Seriously. I have obviously made numerous changes to this recipe on previous occasions only to find out, they were totally unnecessary.
After mine is finished baking, I cool it on a rack. I then wrap it tightly in plastic wrap and I am pretty sure just plastic wrap is the best way to store it. I then proceed to destroy the entire loaf. Luckily, this recipe makes 2.

In the Works
Well, in my head anyway. It’s a bit too early to put the babe’s room together but while going easy on pinched sciatic nerves, aching hips and a sprained neck muscle, I’ve got some time to (internet) window shop, find inspiration in a billion places, and plan lots of little oohs and aahhs. Here’s inspiring pretties, whether it be the colors, textures or projects, that will eventually be thrown in the blender that is my brain and come out jumbled in a baby room.
One more thing: In case you’re wondering, I’m not planning on turning my focus to raising kids on this here, blog. Just going to try and keep with crafts and things that may be nice for all, whether you be the child rearin’ type or not. I mean, I would totally still be making these things for myself anyway.
Go visit this site! You will adore it.

from Mini-Eco
and pretty much all the garland/pennants in this post over at Poppytalk. Instant happy is right!

(My brief Flickr rant: I actually found this over on Flickr (but I’m linking it to another post featuring the whole nursery [which Jennifer did an amazing job on]) but Flickr has now made it impossible to post photos if someone has disabled their downloading. Totally understandable but it just means I would have to write every single person and ask them to send me a jpeg of the picture I want. Kind of annoying for honest folks who would give credit anyway and it makes blogging with visuals especially difficult. SO, if you are the crafty type but like your stuff to be shared with others, you might want to reconsider allowing the public access to your pictures. Just so you know. O.K. I’m done.)
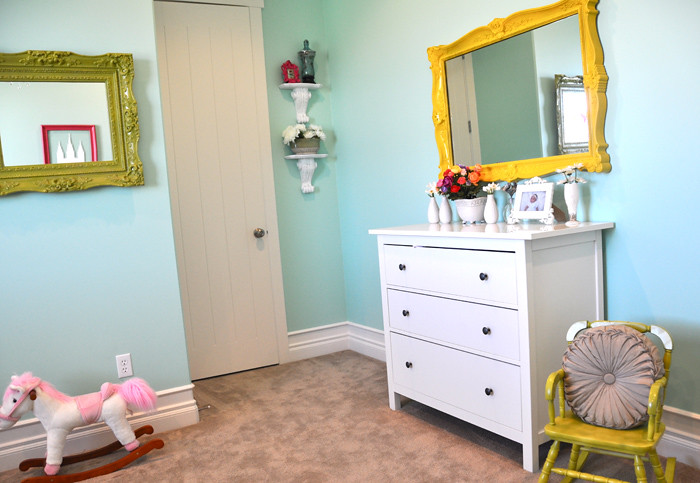
I LOVE these mirrors!

Area rug from The Land of Nod

Adorable flashcards illustrated by Julie Mostad
I’d also love to get her books:

I’m also really looking forward to making a lot of Sunprints. I have always loved these but I think they will really look fantastic against our grey/blue wall and I have done so many in my life, I’m looking forward to the challenge of being more creative with them. If you’ve never done these…well, why not?! They are so fun and you don’t have to be interested in photography to have fun with them. They are great fun for kids too.

Go get creative!