Tip o’ the Week
*Tips that are NEAT-tO know!*

Onions have cells and those cells contain alliinases.
These enzymes are used as a defense mechanism when cells
are damaged and are what make your eyes water when cutting onions.

Here are some tricks to help minimize irritation:
The easiest and the only trick I ever need is to simply
cut the onion from the “growing” end leaving the root end in tact
and attached to the onion until you are finished cutting.
The root end is contains a higher concentration of these enzymes therefore,
cutting the root end off at the beginning of slicing, increases irritation.
Use a VERY sharp knife.
This will cause less cell damage.
Soak onions in ice water for 30 minutes before cutting
or store in refrigerator overnight before use.
This helps prevent the enzymes from activating.
Peel your onion under running water.
OR
Wear goggles!

I mean, you still look pretty cute. (Thanks Mags!)
Busy Body
Things have been pretty crazy around my house lately. My fiancé is on the job market and has been traveling all over the country for interviews. He’s home for one day and then off somewhere for the next 2 or 3 and then home again and over and over. Lots of shirt pressing and driving to the airport. In the midst of it all, I have somehow managed to accumulate a couple of finished projects and numerous works in progress. Here are a few of them.
These are the third pair of scissors I am embroidering for a trio I will turn into pillows for my future work room.

- I think these are so pretty.

- I think they will look so neat on pillows side by side.
Here is a project I actually completed.
I really needed a better way of keeping all my circular knitting needles in order. This one is specifically for me and I have a slightly different design for ones I would like to produce for future sale. I am hoping to sell these along with my original apron designs and pillows and whatnot at some point in the near future.

- Love this Alexander Henry print!
On top of this, I am also working on my first pair of socks. They seem to be taking forever although that simply may be because I have never done it before. Every sock knitter says it is easy to become a knitted sock fan but I only see this happening to me if I can speed it up a bit. I’ve always had a little problem with my need for immediate gratification.

for Richard
Tip o’ the Week
*Tips that are NEAT-tO know!*
Never store your potatoes with your onions. The alliinases will rot the potatoes faster.
(Alliinases will be in my “Tip o’ the Week” next week!)
Slice a potato in disks and put one or two in each houseplant plagued with gnats. Every 2 days, throw away potato slices and replace with new ones. Do this for about a week and you will rid your pretty little plants and house of those pesky gnats.
(This works because they will lay their eggs [hundreds] on the potato. They will find a better spot to raise their little ones.)
Throw large chunks of potato in a soup that’s over salted. They work like a sponge. Remove potato before it’s soft.
Stitchy Goodness
I thought I’d give you some more examples from my personal collection of embroidered goods. It’s such an easy way to dress up your home or personalize a gift for some lucky friend so if you’re ready to get started, I suggest you go here. I see no sense in doing my own tutorials when Jenny Hart has already mastered the art of teaching embroidery. She also happens to be based in my hometown, so you know she’s good people! Once you have mastered the basics, move on to this site for their amazing archive of “A Stitch a Day”! There are so many neat ones! Print out each stitch page, stable them together and just go through each one! It’s so easy and in no time you’ll look and feel like you’ve been doing it for years.

mmmmm...
You can NEVER have too many tea towels!


Or use your original designs for beautiful art in textile form.


These are my new personal favorites.
Your Parents Didn’t Lie
I ate my very first Brussels sprouts about a year ago thanks to my fiance. (He cooks a few things and what he does cook, he does quite well.) I couldn’t believe it! These things are incredible! What was all the fuss about? I don’t like cabbage and I love these things. These are like the softer, prettier second cousin-that it’s o.k. to drool over-of the cabbage.
I believe you typically hear of them being bitter. Well, frankly this would be because they aren’t being cooked right. It’s a fact. If they are overcooked, a certain chemical is released which actually produces a sulfurous odor and in turn also makes them seem bitter. If you have never given them a chance, I suggest you do now. You may start a love affair of your very own.
This is our favorite way to cook them. It takes about 8 minutes and they are wonderful with the Apricot Pork below.

You will need:
- Brussels sprouts
- butter
- lemon
- salt and pepper
*O.K. I know you’re thinking, “This isn’t really a recipe! There’s nothing in this!” If you ask any good chef, they will tell you, “Sometimes less, REALLY is more.” Also, not everyone knows how to prepare these guys and I love to teach all of all skill levels.*
Cut the bottom stalk part off of each and cut each in half from top to bottom. Discard any layers that fall off naturally. Put them flat side down in a skillet. Add 2 Tbs butter and turn heat to high. After the butter has melted, sprinkle salt and pepper over the sprouts. After 4 minutes, turn heat to medium and add 2 more Tbs butter and squeeze juice from half a lemon over sprouts and immediately cover with a lid. Steam them for about a minute or until they turn a rich green color. Remove lid and continue to cook until browned and slightly tender. When they are done, toss them in the pan a couple times to distribute lemon and salt and pepper.
♥Voila!♥
People Think You’re Fancy
O.K. So they don’t, but you can change all that.
Now, If you know me, you know I have never been a fan of the whole sweet+meat idea. I don’t like pancake syrup getting on my sausage nor do I like brown sugar on my meatloaf. This recipe however, is an exception. You can also use this for pork tenderloin but it is typically too small for the stuffing.
Apricot Stuffed Pork Roast
You will need:
- 2 lbs boneless pork roast (typically already wrapped in baking elastic/twine)
- 1/2 cup dried apricots, diced
- 2 Tbs apricot jam
- 1 shallot, diced
- salt and pepper
- 2 Tbs olive oil
Preheat oven to 450°. In a bowl, combine jam, shallots, apricots and about 1 tsp salt and 2 tsp pepper and mix together. Cut a slit in the middle of your roast to create a pocket. Do not cut all the way through the opposite end.

Here’s another great use for your decorator’s icing bag! Fill bag with jam mix and squeeze mix down into pocket. Push it down so it’s really packed. (Until I realized I could use the bag, I used my hands. Messy but no biggie.)
It will spread as it cooks so do not fill all the way. You want to leave a little room at the end.
Heat oil in skillet on medium high. Sear roast all the way around. (Searing helps this retain it’s juices and makes it pretty.)

I recommend lining your cookie sheet or loaf pan with foil as the sugar in the stuffing can burn onto your pan and essentially ruin it. Bake until internal temperature is 145°. Avoid hitting the stuffing when using your meat thermometer as the stuffing will be hotter than the meat. Make sure you are temping the meat. Yeah, yeah, I know your thermometer says like, 180 crazy degrees for pork or something but this is a “Cover Your Ass” kind of thing for the thermometer company. Please, just trust me. If you cook this roast over 160°, I promise it will be so dry, your dog won’t want it.
145° is perfectly high enough to kill anything that may make you sick without destroying the integrity of the meat. If it scares you, go ahead and try it at 160°. It will still be edible but you’ll see that it could stand to be cooked a bit less.

You Bring the Eggs!
This is a classic Betty Crocker tip that I love.
If you’re making a large amount of deviled eggs,
try using a decorator/icing bag to fill the egg halves.
It looks prettier and it’s not as messy!

mmm...devilish!
Twice Baked Potatoes
Potatoes. The number one reason I could never give up carbs. I love them in any form or fashion and twice baked is one I especially love but often forget about.

This is for 2 large russets. Takes about an hour and a half to two hours.
You will need:
- 4 strips bacon
- 1 tsp. salt
- 1/2 TBS pepper
- 2 TBS butter
- 1/2 cup sour cream
- not quite 1/4 cup chopped chives
- 1/2 cup shredded cheddar plus some for topping
Pierce with fork many times all along edges only. Wrap in foil. Bake @ 375 for about an 1 hour and 20 minutes or until soft. Use a thin potholder to gently squeeze them to check for doneness. Leave oven on when they are done. You will be putting them back in.
While potatoes are baking, cook bacon to crispy and set aside on paper towel. Then in a bowl combine, salt, pepper, butter, sour cream, 1/2 cup cheddar cheese, chopped chives. Crumble bacon and add to bowl. When potatoes are done, cut them in half along side (like to make a bowl). Scoop potato out of skin. It’s o.k. if it tears a little. Mix potato into bowl. Mash up and mix. Put skins on baking pan and butt them right up next to each other. Scoop mixture into skins. Top with a little more cheddar cheese. Put back in oven for 10-15 minutes.
(Depending on how much potato there is, you can add a little more sour cream if the mix seems dry.)
Tip o’ the Week
*Tips that are NEAT-tO know!*
Microwave your lemon for 5-8 seconds before juicing or roll it on the counter several times, pressing it against your palm.
It makes it easier to squeeze and you’ll get more juice from it!
Zesting is best and easiest when your lemon is VERY chill.
When squeezing the juice from a lemon half directly into a recipe,
squeeze with the cut end against your palm and facing up to avoid dropping seeds into it.

It’s o.k. to get the juice all over your nails. In fact, it brightens them!
Fresh cut fruit will keep looking fresh longer if lightly coated in lemon juice.
Add lemon juice to your vinegar for cleaning to neutralize the smell.
Lemon juice is a degreaser!
Put lemon slices in a bowl with water and microwave it until very hot.
This will make cleaning your microwave easier.
Use lemon juice to remove lime from faucets and taps.
White on White = Magical
In addition to having dozens of projects in the works, I am also in the midst of wedding planning. I’m working on some hankies for a few family members and personalizing them with white thread (immediately below). A design in one corner and name and date in the opposite corner. There is just something magical about this look. Delicate, romantic, vintage, experienced. Just one more reason to be attracted to embroidery as a hobby.
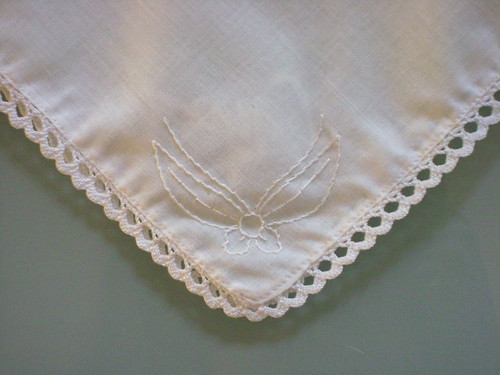
simply, yet thoughtful gift
Here are a couple more examples of the beauty of this style. You MUST look at this woman’s work.
Her talent is undeniable. Her work, unique and timeless.

So elegant!

I am a sucker for text.
I believe Karen Ruane’s blog and Etsy shop have sufficient evidence as to what an incredibly beautiful craft this can be.
Tex-Mex Pot Pie
A 5 MINUTE MEAL
(please read disclaimer here)
AKA: King Ranch Chicken
AKA: Mexican Lasagna
Kids love this and so do people who “hate casseroles” (AKA my fiancé)! This will usually feed (with 3 large chicken breasts) 2 adults with a child or leftovers or an adult and 2 kids with leftovers.
You will need:
- 1 can cream of mushroom soup
- 1 can cream of chicken soup
- 1 can Ro-tel (read about it here)
- 2-3 boneless skinless chicken breasts
- 1 small to medium green bell pepper
- 1 small to medium yellow onion
- 2 cups shredded cheddar or pepper jack cheese (kids usually prefer the cheddar version)
- 6 corn tortillas
In a large pot, boil enough water for the chicken to be submerged. Boil chicken on medium high for 20 minutes or until done.
Meanwhile, preheat oven to 400°F and empty both can of soups into large mixing bowl. Chop onion and bell pepper. Heat 3 TBS. olive oil and sauté onion and bell pepper until tender. Remove from heat and add cooked veggies to soup mixture.
 Remove chicken from water (Do not discard this “broth”) and chop and slightly shred chicken and set aside. Take 1/3 cup of broth and mix into soup mixture keeping remaining broth aside. Spray your glass baking dish (I use 9 x 7 x 2½”) with non-stick spray. Soak 3 corn tortillas in reserved chicken broth until soft. (Just a few moments.) Layer on bottom of pan.


Spoon ½ of soup/veggie mixture on top of tortillas. Spread ½ of chicken on top. Drain liquid from Rot-tel and spoon ½ over chicken. Dip 3 more tortillas and layer. Add what’s left of the soup mixture, then chicken, then Ro-tel. Add cheese to top and cover with foil. Bake for 25-30 min. or until bubbly.

♥Voila!♥
Email subscriptions Available
Stay up to date on tips, tricks, tutorials and all things that help make you
even more neat-o and your home more beautiful!
In no time, you will overhear people saying,
“He/She can do anything!”